Industrial Design Prototyping: Examples & How to Do It
Key Takeaways
Successful industrial design prototypes translate abstract concepts into tangible models that save companies thousands in production costs by identifying flaws early.
James Dyson's famous 5,127 prototypes journey demonstrates how persistent iteration is often the key to revolutionary product breakthroughs.
Different prototype stages serve different purposes—from quick cardboard mock-ups for initial concepts to high-fidelity 3D printed models for final testing.
Modern prototyping combines traditional hands-on techniques with advanced digital fabrication methods, such as CNC machining and additive manufacturing.
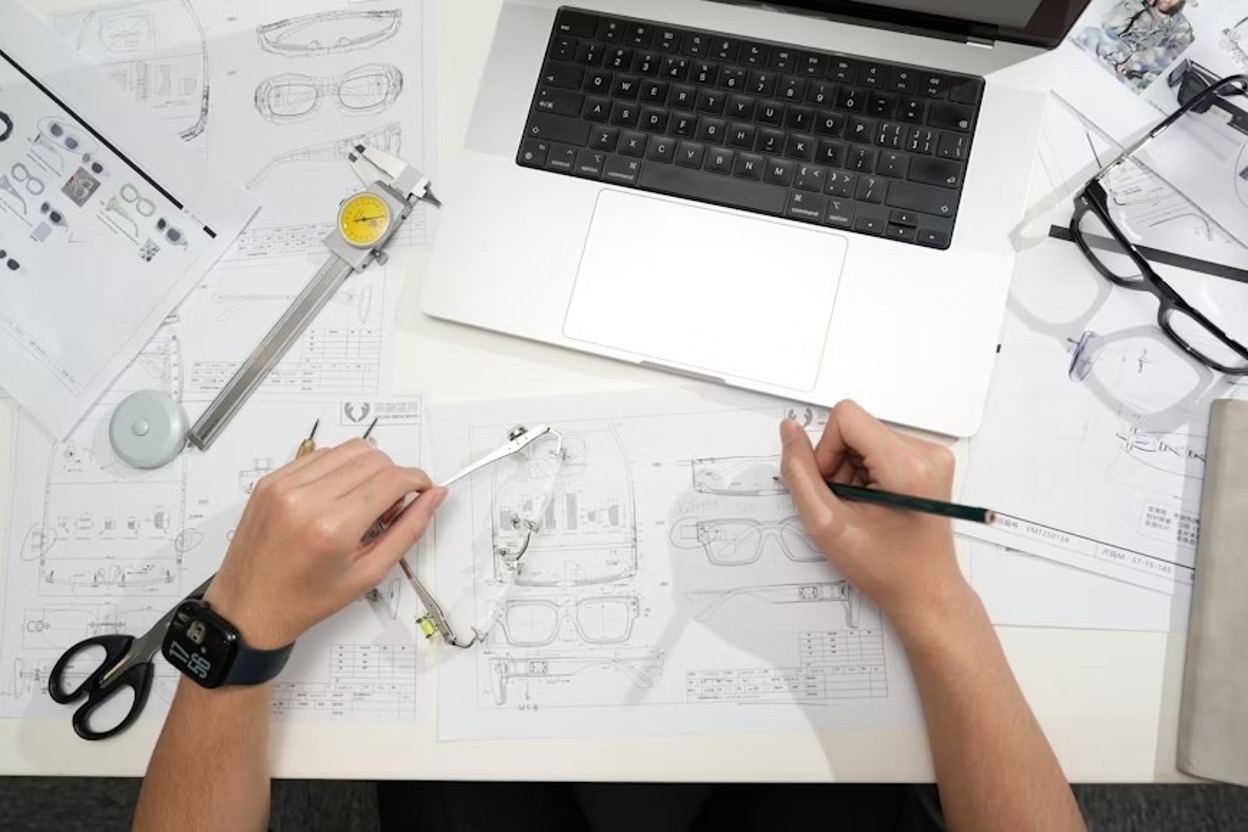
Rabbit Product Design builds production-ready prototypes—our team uses actual manufacturing materials instead of 3D prints to expose real constraints early and ensure successful transitions to production.
The Real-World Impact of Prototyping in Industrial Design
Prototyping transforms abstract ideas into physical reality, serving as the crucial bridge between concept and production. In the world of industrial design, a prototype isn't just a preliminary model—it's a powerful communication tool that speaks volumes to stakeholders, engineers, and users alike.
Through tangible interaction with a prototype, designers can validate assumptions, test functionality, and refine aesthetics that digital renderings cannot match.
Each iteration reveals insights impossible to discover on paper or screen. Consider how a simple handle prototype might reveal ergonomic flaws that can be discovered only through physical interaction, potentially saving a product line from costly post-launch modifications.
This hands-on testing phase allows designers to fail early, fail often, and ultimately create products that genuinely solve user problems.
2 Inspiring Industrial Design Prototype Examples

The most groundbreaking products we use daily emerged through rigorous prototyping processes that transformed ordinary objects into revolutionary tools.
1. Dyson Vacuum: 5,127 Prototypes to Perfection
James Dyson's journey to creating his revolutionary bagless vacuum cleaner stands as perhaps the most famous testament to the perseverance of prototyping in the history of industrial design. Over five years, Dyson built 5,127 prototype iterations before achieving the perfect cyclonic separation system.
Each prototype addressed specific performance issues (suction power, filtration efficiency, weight distribution, and ergonomics) gradually refining the revolutionary design. This meticulous approach ultimately disrupted an entire industry and created a multi-billion-dollar company built on superior design principles.
2. Apple AirPods: From Concept to Cultural Icon
Apple's development of AirPods illustrates how prototyping must address not only technical functionality but also aesthetic appeal and cultural adoption.
Initial prototypes focused on solving the fundamental wireless connectivity challenges, creating dozens of antenna configurations to ensure reliable Bluetooth performance. These technical prototypes were followed by ergonomic studies using silicone ear models and 3D-printed shells to refine the "universal fit" that accommodates diverse ear shapes.
The most fascinating aspect of AirPods prototyping involved solving invisible problems. Engineers created specialized prototypes with embedded sensors to measure heat buildup during extended use, while others focused on optimizing microphone placement for voice clarity in noisy environments.
This comprehensive prototyping approach resulted in a product that transcended its category to become a cultural icon.
How to Create Your First Industrial Design Prototype
Step 1: Define Your Prototype Goals & Requirements

Defining your prototype goals and requirements is the first and most critical step to take before building an industrial prototype.
Before touching any materials, clearly articulate what you need to learn from your prototype. Are you testing a mechanical function, validating ergonomics, or simply visualizing scale? Different goals require different approaches.
A concept prototype might use inexpensive materials and simplified mechanisms, while a pre-production prototype demands production-grade components and finishing.
Requirements documents should include quantifiable metrics whenever possible. Instead of "comfortable grip," specify "handle diameter between 30–40mm based on anthropometric data." These precise parameters create clear evaluation criteria during testing phases.
Consider creating a prototype evaluation matrix that lists each requirement and its pass/fail criteria to ensure an objective assessment.
Step 2: Choose Your Prototyping Methods
Modern prototyping leverages both traditional and digital techniques, each offering distinct advantages. Sketch models using foam core, clay, or cardboard provide quick physical feedback on form and proportion, while 3D printing enables complex geometries with relatively fast turnaround.
Computer Numerical Control (CNC) machining offers superior material options and strength, but requires more technical preparation. Injection molding prototypes (often using aluminum tooling rather than production steel) provide the most accurate representation of final products, but at significantly higher cost and longer lead times.
Digital prototyping with software such as Fusion 360, SolidWorks, or specialized simulation tools can validate certain aspects before physical production. While many firms default to 3D printing for speed, the optimal approach uses actual manufacturing materials and methods (CNC machining, sheet metal fabrication, or sample molds), so that prototypes expose real-world constraints from day one rather than creating false confidence.
Step 3: Select the Right Materials
Material selection for prototypes balances the representation of final products with practical constraints on time, budget, and availability. For appearance models, materials like high-density foam, various plastics, and composites can approximate the visual and tactile properties of production materials.
Functional prototypes may require materials with specific mechanical properties, such as machined aluminum for heat-dissipating components or engineering-grade plastics for snap-fit assemblies.
Consider whether your prototype requires exact material properties or can use substitutes. Surface finishes often prove crucial for user testing; a 3D printed part might have the right shape but provide misleading tactile feedback due to layer lines or material texture.
Post-processing techniques such as sanding, painting, or applying surface treatments can help bridge the gap between prototype and production materials. When exact material performance is critical (as with medical devices or load-bearing components), early investment in production-equivalent materials is essential, despite the higher costs.
Step 4: Build Your Prototype
Successful prototype construction begins with proper preparation, gathering tools, materials, and reference documentation before starting physical work. Document the build process with photos and notes, capturing not only the final result but also the steps and challenges encountered along the way.
This documentation is invaluable for communicating with team members and for returning to the project after a delay. Consider creating assembly fixtures or jigs for components that require precise alignment, especially if you'll need to disassemble and reassemble the prototype during testing.
Most importantly, maintain flexibility during construction, as some of the most valuable insights emerge from adapting to unexpected challenges.
Step 5: Test, Gather Feedback, & Iterate

Effective prototype testing requires structure and objectivity. Create testing protocols that address your specific questions and evaluate performance against predefined criteria.
Whenever possible, conduct testing with users who match your target demographic and observe their interactions without excessive guidance on your prototype. Document both quantitative measurements and qualitative observations; the hesitation before a user tries a particular feature can be as revealing as formal metrics.
Feedback gathering should extend beyond simple like/dislike reactions to probe deeper into the underlying reasons. Ask "why" questions that reveal user mental models and expectations. Record sessions (with permission) to capture nuances missed during live observation.
After gathering feedback, start the iteration. Each new version should specifically address insights from previous testing rather than making arbitrary changes. Document modifications between versions and maintain older prototypes for comparison.
This progressive evolution builds institutional knowledge and prevents the repetition of unsuccessful approaches. Remember that "failed" prototypes often provide the most valuable learning, so celebrate these critical insights rather than viewing them as setbacks.
Master Industrial Design Prototyping with Rabbit Product Design
Industrial design prototyping is where ideas prove themselves or reveal their flaws before costly mistakes happen. The key is knowing how to progress through prototype stages strategically, from quick concept mock-ups to production-validated models that manufacturing partners can actually build.
At Rabbit Product Design, we approach prototyping differently from most firms. We don't rely on 3D-printed models that look impressive but hide critical manufacturability issues. Instead, our production-ready prototyping uses real manufacturing materials and processes, ensuring that what works in the prototype stage will work on the production line.

At Rabbit Product Design, our honest approach has saved our clients from the expensive surprises that derail so many product launches.
Our structured development system guides products through feasibility analysis, concept development, industrial design, mechanical and electronic engineering, prototyping, manufacturing setup, branding, and launch planning.
Our senior team averages 27+ years of experience, bringing deep expertise to every iteration. Whether you need a single prototype phase or complete end-to-end development, we ensure each version moves you closer to a manufacturable, sellable product.
Ready to prototype the right way? Contact Rabbit Product Design, and let's build something that actually makes it to market.
Start Your Product Journey Today→
Frequently Asked Questions (FAQs)
How many prototypes should I make before going for final production?
Most successful consumer products undergo at least three distinct prototyping phases: concept prototypes for basic functionality, refined prototypes for user experience, and pre-production prototypes for manufacturing feasibility. Complex products often require 5–10 major iterations, while revolutionary products like Dyson's vacuum need thousands.
Should I use the same materials in my prototype as the final product?
It depends on your development phase. Early concept prototypes rarely require production-grade materials, as they primarily validate form and basic functionality. As you approach production, material fidelity becomes critical, especially for components where mechanical properties, thermal behavior, or tactile feedback directly affect functionality.
How do I protect my prototype design from being copied?
Focus primarily on speed to market rather than protection. Use confidentiality agreements (NDAs) before sharing with manufacturers or testers, and maintain detailed documentation with dated files to establish your development timeline. Most importantly, maintain development momentum; competitors who copy will always lag behind your continued innovation. Consult a qualified IP attorney if protection becomes necessary, but don't let IP concerns slow your path to production.
Why does Rabbit Product Design avoid relying on 3D-printed prototypes?
Rabbit Product Design believes that 3D-printed prototypes create false confidence by masking manufacturability issues that surface during actual production. Printed materials differ from production materials in strength, durability, and surface properties. We build prototypes using actual production materials and methods to expose real-world constraints early, preventing costly failures during the manufacturing transition.
*Disclaimer: This content is for educational purposes only and not financial, legal, or business advice. Figures vary by circumstance. Consult qualified professionals before making decisions. For personalized guidance,contact Rabbit Product Design.